Lesson 6: Beam me up! Teleport Ellen to new levels
Checked with version: 2018.2.1 - Difficulty: Beginner
In sixth and final lesson, you're going to learn how to teleport your game hero, Ellen, from one part of a Scene to another. You'll also learn how to add a new Scene, and teleport Ellen from one Scene to a different Scene. Remember, think of Scenes as unique levels.
Set yourself up for success by setting aside at least 1 hour to complete this lesson. If you get stuck, seek out answers and help in our moderated 2D Game Kit forum.
Teleporting within a Scene
To teleport the player within a Scene, you need to set up a transition. For this, you need to define where the transition begins and ends.
- Determine within your Scene where you want to teleport Ellen from and to, and then move Ellen and the Cameras to where you want her to teleport from (the transition start point)
- In the Project window, navigate to Prefabs > Interactables
- Drag the Teleporter prefab into your Scene and place it where you want Ellen to teleport from
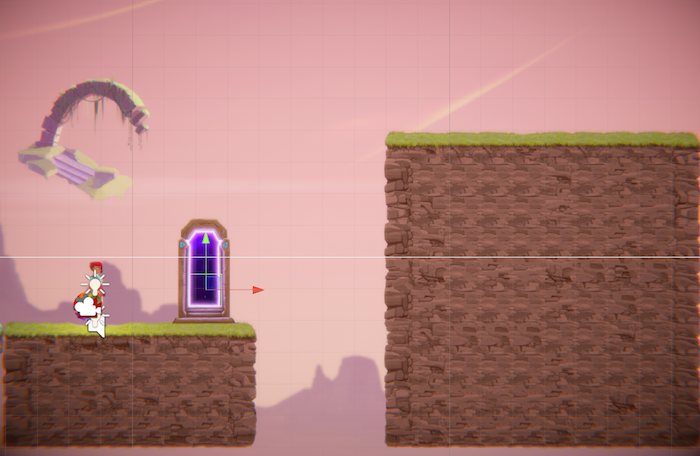
- In the SceneControl folder drag TransitionStart into the Scene and place it over the Teleporter so that the player will touch the Collider (the green box) when walking into it
See how it looks in the image below:
To set up the destination:
- Drag another Teleporter prefab from the Interactables folder into the Scene and place it where you want Ellen to teleport to
- Click on TransitionStart in the Hierarchy
- In the Inspector, find the Transition Point Component "Transition Point (Script)"
- Set Transition Type to Same Scene
- Drag the Ellen GameObject from the Hierarchy into the Transition Point Component’s Transitioning Game Object slot
- In the Hierarchy, locate your destination Teleporter prefab (probably named "Teleporter (1)") and drag it into the Transition Point Component’s Destination Transform slot
- Press Play and try it out!
- And always remember to save your Scene
![]()
You'll notice that Transition When is set to On Trigger Enter, which means that the Transition automatically activates when the player enters the Collider. If you’d rather teleport only when the player presses the interact key (E), set Transition When to Interact Pressed.
Teleporting to another Scene
To make the player transition to a new Scene (level), first you need a new Scene for the player to transition to. Thankfully your 2D Game Kit already has five fabulous Scenes ready to go for you! But if you want to create your own new Scene from the original template, then in the Project window navigate to Assets > 2DGameKit > Scenes > Utilities and double click to open the _TemplateScene. Go ahead and name and save your Scene: File > Save Scene as… You should also move your new Scene into the Scenes folder like you did at the start of Lesson 1. For the purpose of this lesson we’ll work with one of the existing five Scenes that come with the 2D Game Kit.
Setting up TransitionDestination
Unlike transitioning within the same Scene, in order to transition to a new Scene, you have to use a TransitionDestination prefab. TransitionDestination is a prefab which "receives" the player. It contains a Transition Destination Component. Let’s start by placing this prefab in a new Scene.
- In the Project window, navigate to 2DGameKit > Scenes
- Double click on the Scene named Zone1
- Determine where you want Ellen to teleport to in this Scene
- Navigate to the Project window, and go to Prefabs > SceneControl
- Drag and place the TransitionDestination prefab in the location you want the teleporter to lead to. Hint: Click the Move Tool to see exactly where you placed it and move it to the precise location desired
- Save your Scenes
The TransitionDestinaton prefab contains a Scene Transition Destination Component:
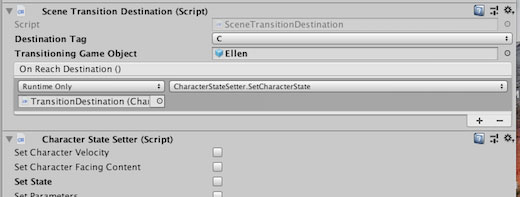
- First, set the Destination Tag to letter C. Why C? Because in this Game Kit, letters A and B are already used, and Destination Tags have to be set up so that the Scene Transition Destination Component is unique per Scene. So, let's choose C, since we know it's unique
- Next, tell it which GameObject it should expect to receive. Drag the player GameObject (Ellen) from the Hierarchy window to the Transitioning Game Object slot
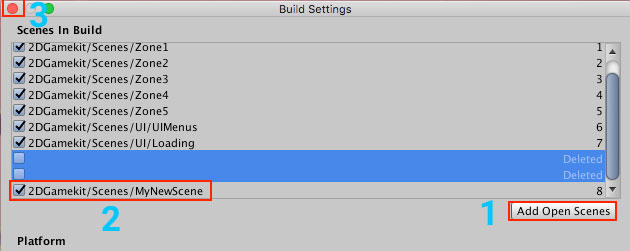
- Finally, make sure your destination Scene is in your Editor’s Build Settings. To do this, go to File > Build Settings and click Add Open Scenes
- Make sure the Scene you created at the start of Lesson 1 appears in the “Scenes in Build” list. Ensure it is checked, along with any other new Scenes you might have created in the meantime that you want to add to the Build Settings. You can see in the image below “MyNewScene” has now appeared in the list after clicking “Add Open Scenes” and is checked
- Now you can exit the Build Settings window
- Save your Scenes
Setting up TransitionStart
Now that you've set up where Ellen will teleport to, you can set up where she'll teleport from.
- Navigate to the Scenes folder and double click to open up the Scene where you want Ellen to teleport from
- Move Ellen and the Cameras to the location in the Scene where you want her to teleport from
- In the Project window, navigate to Prefabs > Interactables
- Drag the Teleporter prefab into your Scene and place it where you want Ellen to teleport from
- In the Inspector's Transition Point Component "Transition Point (Script)", drag the Ellen GameObject from the Hierarchy into the Transitioning Game Object slot
- Set Transition Type to Different Zone. Hint: There is a known bug on some versions of Unity that might cause you to not be able to select "Different Zone". If this happens to you, try following the fix outlined here in the 2D Game Kit forum
- Set New Scene Name to the Scene you want to send it to -- in this case it's Zone1
- Set Transition Destination Tag to the Destination Tag letter you set in the Transition Destination Component -- in this case it's C
- Set Transition When to On Trigger Enter

Press Play, and walk into the Teleporter. Ellen should travel all the way to the Teleporter you placed in in Zone1!
Save your Scenes, and mark below that you completed the sixth and final lesson of the 2D Game Kit, hooray!
Supporting live training video
Lesson 6: Teleporting within a Scene
Note: The instructions Lesson 6 are from 00:00-3:21. This part of the video covers teleporting within the same Scene. The video does not cover teleporting from one Scene to a new Scene. Starting at 3:22 the video covers how to add dialogue boxes to the game, which is not covered in the text material above, and you can consider it extra credit!